Our Amateur Radio satellite, Fox-1A (now officially AO-85), hitched a ride on #NROL55 this morning out of Vandenberg Air Force Base.
Anyone with a ham radio license can utilize the transceiver on board the satellite, at least once we complete testing and confirm full functionality. The satellite is currently transmitting telemetry.
FM mode
UHF uplink: 435.180 MHz, PL tone 67 Hz
VHF downlink: 145.980 MHz. This is the frequency on which you listen.
It’s done! The Fox-1A CubeSat satellite has been integrated into the Poly-PicoSatellite Orbital Deployer rig (P-POD) with two other CubeSats. The loaded P-POD will be integrated into the rocket payload for subsequent launch in late summer 2015.
Fox-1A was hand delivered in it’s Pelican case to Cal Poly in San Luis Obispo for completion of CubeSat Acceptance Checks, then integration.
The following are photos concerning the integration. Click on each page for larger version (new window)
Fox-1A on the right with the two other CubeSats for this particular P-PODFox-1A CubeSat satellite installed in P-PODLarger view of the loaded P-PODCubeSat P-POD closed
(VIDEO at the bottom). Remember to Twitter and comment, thanks!
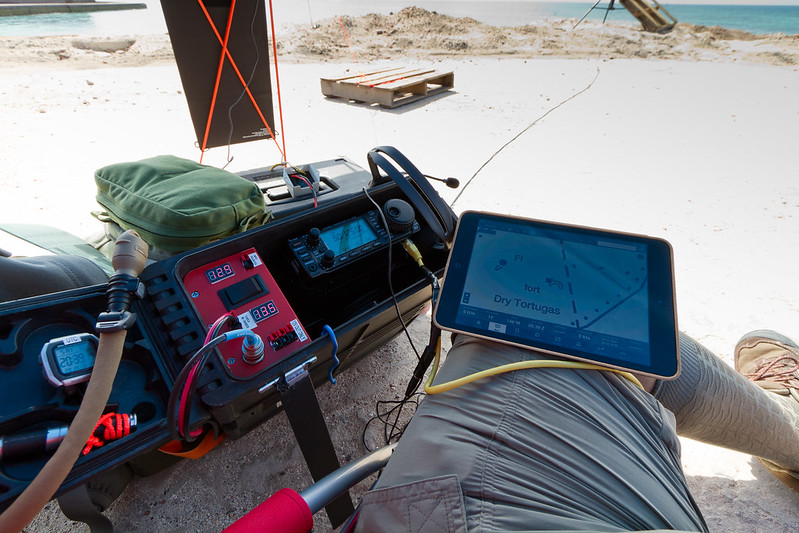
Ham radio GoBox in 25mm ammo can
The ‘shack’ is the place where an Amateur Radio operator sets up their radio gear. A spare bedroom, a structure in the backyard, inside the roll-up desk in the corner of the living room, whatever.
In this case I put all the gear necessary for making contacts inside a can, a 25mm ammo can, which, naturally, holds 25mm ammo. Cannon shells specifically. Numbers on the can: Part No: 12013854, Container Assy No: 12013870, Container and Ammo: 12013668
Of course it now holds the key to talking around the world.
Usually all you need to make contacts is the transceiver (radio) with connections for antenna and power.
In this case I put the radio and the power, a battery, in the same container. Then I ran the antenna connection, aka ‘jumper’, from the back of the radio forward to a 3D printed panel I designed in Solidworks CAD. This panel had a voltage display to show me the state of charge for the battery along with some 12V outputs and the aforementioned connector for the jumper.
Here is it’s construction.
Everything began with the radio. The more the radio itself featured, the fewer external components that would need to be dealt with.
The first thing I’d noticed about HF transceivers is that they always seemed to have some external tuner connected. My goal then became finding a transceiver with an internal tuner.
Then I’d noticed that rigs loved amps. The second goal became finding a transceiver that sipped the amps instead of chugging them.
Then overall size. I needed a rig that was compact and wasn’t so heavy as to be an anchor for an aircraft carrier.
Seems like a tall order right?
There are certainly a variety of options out there but personally I whittled them down to:
Yaesu 857D, Yaesu 817ND, Elecraft KX3, and the ICOM IC-703 Plus.
The 857D had the power but at low output settings still sucked amps and it didn’t come with a tuner. The 817D is a neat compact rig, had the power sipping requirement but no tuner and it was only 5W output. That explained why most online videos show this rig being operated using CW.
The Elecraft KX3 had it all … plus a price tag. So unfortunately that was out.
Enter the 703 Plus, a discontinued rig. I had to go there lol. It too had it all. The only thing that would make this rig perfect (as well as the KX3) is 25-30W output.
Not 100W? Nah, then you really lose the power sipping requirement that you need in a portable. 25-30W seemed like the best compromise.
But alas both the KX3 and the 703 Plus had 10W output. Three amp draw on the 703 Plus and a little less even for the KX3.
That’s ok. Antenna, antenna, antenna.
Just a reminder … we’re going for compact here.
That meant wire. There seem to be more wire antenna options than rigs so let me skip to the end and tell you that I went with the EARC end fed wire with it’s 9:1 UNUN setup. Their website also supplies instructions for making your own. I chose to support the club and placed the order.
From Miami, FL I’ve QSO’d with Argentina and Eastern Europe on 10w with that end fed wire.
So we had the radio and the antenna. Now we needed power. A simple matter of choosing an SLA right?
Not yet. First we had to choose our container and then see which SLA would fit inside along with the radio.
Enter the polymer 25mm ammo can. Polymer so it wouldn’t rust and it wouldn’t cause undue damage to whatever surface it was placed on. Both the front and the back opened up (not such a big deal if you were to simply create a pull out rack) and watertight.
MOST importantly though … it looked cool. Priorities.
A few labels made up in Photoshop and presto, I had an Official Communications Setup (c).
So which battery would fit in that box? The typical SLA design meant that the largest I could fit in the box, along with the 703 Plus, was a 9Ah battery. Owing to the choice of rig that meant sufficient power for a full day’s casual operation.
To keep everything clean I designed the control panel section to house a Double Pole / Double Throw / Center Off switch, voltage displays, inputs/outputs and antenna connection.
I wanted everything to come out the front of the box to avoid opening the back.
I used a piece of stiff cardboard as a mockup, cutting out the pertinent areas to iron out the ergonomics.
With the lessons learned from that, and component measurements taken with my reloading calipers, I built a model in CAD that I subsequently had 3D printed.
A week later it was ready for install.
My wiring design is different from most in that I have two Anderson PowerPole inputs and two voltage displays (then one triple set of APP outputs, such as to charge an iPad).
The overall wiring design revolves around the DPDT switch.
One direction of the DPDT switch uses the internal battery to power the radio and the APP outputs.
The other direction cuts the internal battery off from the circuit and engages the external power input to run the radio and APP outputs.
Why did I do it that way? The intent for the box was portable operation which to me meant solar power and that meant moderate charging power.
By isolating the internal battery I could channel all that solar power into charging that internal while running off an external. The dedicated display would let me see the state of charge. Naturally I could also charge and run at the same time if I so chose, essentially solar floating the battery.
I also had a 35ah SLA in a separate box but due to the continuous clear skies I was able to solar float the internal all three days of my DXpedition.
As you’ve guessed, everything in the control panel is back-secured for a nice clean appearance and the state of either power source is readily visible. The three screws attach the panel to a block that is secured to the box. This way I can easily remove the panel to get to the wiring if necessary.
Again, unlike most people, I have only the radio leads fused.
I went with the Morningstar SG-4 Pulse Width Modulation solar charge controller and a folding solar panel.
The PWM algorithm wouldn’t be fooled into bulk charge mode by the transient keying and unkeying of the transceiver.
The panel was the Instapark Mercury 27, a 27w panel the size of a thick notebook when folded.
Still I ran out of room inside the box so the solar panel travels outside.
Back to the radio. The radio is held in place by two pieces of bent, 1in wide, 1/8in thick aluminum from the local big box construction store with the bottom of the radio resting on the battery.
With the lid closed the radio remains in place. With the lid open I’m able to slide the radio out. Besides, I could always just open the back lid.
Originally I’d tried to Velcro the aluminum to the box, which worked ok … for a while. Then I tried the much vaunted double sided acrylic tape from 3M (think GoPro sticky stuff) but that soon also unstuck.
I couldn’t drill into the box, I’d compromise the watertight nature even if I used rubber washers.
And, again, MOST importantly … it would look ugly. Priorities.
Epoxy didn’t stick either. So there I was, still trying to come up with a way to attach the aluminum.
Two days later it hit me … 3M Fast Cure 5200. It had been a while since using that stuff so I had forgotten about it but it would be perfect. The power of epoxy with some slight flexibility but now with sticking power.
The ‘stand’ is the remaining portion of the aluminum secured to a hinge which is then secured to the box, again using 5200. Just a leaning post really, as you can see in the pictures.
We have the radio held in place, control panel to it’s left. Under the forward part of the radio is my headset and homebrew Push-To-Talk switch built off a Cat5 cable. In the lid I placed several dots of Velcro. To this I attached a band-less digital watch set to UTC, a small AAA flashlight, and a pencil.
Open the back lid and we have the 9ah battery, 33 feet of antenna wire, 9:1 UNUN and 16ft of SO-239 terminated RG-8x coax under the rear part of the radio.
Yep, it all fits.
On a DXpedition to Fort Jefferson on Garden Key in Dry Tortugas, in addition to the end fed, I brought a mast supported antenna that I could configure as a 20m 1/4 wave vertical or as a 6m yagi. I knew from my research of the location that I couldn’t attach anything (at all) to the trees or foliage down there so a mast would be required. Plus there was nothing on the North Coaling Dock to attach to anyway.
So there it was, everything nice and secure, a control panel where I could plug and unplug items and leave the box in position, a strong case that I could cinch down with ratchet straps, and watertight in case a rain storm came upon me.
Worry free and it added up to a 24lb shack in a can that was, best of all, easily transported.
Three months of prep to get over to Dry Tortugas; specifically Garden Key, home of Fort Jefferson.
My view from the bow of the ferry on approach to Fort Jefferson on Garden Key, Dry Tortugas
Fun fact:
I wrote the article BEFORE heading over. 😀
I used it to create my plan of action in getting to the Key, setting up and operating my ham radio station and developing goals for each day.
Then I edited the article accordingly. I was about 90% on with my article. 😀
==========
Posing next to the 1/4 wave vertical antenna on the North Coaling Docks at Fort Jefferson, Garden Key, Dry TortugasPosing at the entrance to Fort Jefferson on Garden Key in Dry Tortugas